Oi! Nimrod! Where have you been?!
Well, hello to you too, dear reader! Long time no… speak? post? Whatever, it’s been a while.
I have many updates with which I can grace your computer screen - I’ve moved from Raleigh back to Durham, my home network has changed shape multiple times (including the introduction of some spicy enterprise-grade gear), and I became a solo cat dad for the first time!
However, none of those are the topic du jour, and will be saved for future posts. Instead, we’ll start with one of the more important topics - namely because it pertains to how this website works!
Quick refresher - where we are
Why Hexo?
For those who don’t remember (which I assume is most of you… don’t worry, I don’t blame you), I use Hexo as my blogging framework of choice. I go into detail about my decision in this blog post, but TL;DR:
- Wordpress, Drupal, and the like are all entirely too heavy
- Flat files vastly preferred - version control
- Hexo was ultimately chosen for its simplicity
I used a tutorial on DigitalOcean to accomplish this, and if I’m being brutally honest with myself, I didn’t 100% understand the process I was following. Bare repos? Git hooks? Publishing to Heroku? I just wanted a blog. This, while exposing less complexity to the rest of the world, had ironically created more complexity for myself - no WYSIWYG editor, manual deployment with confusing steps, etc…
Being honest with myself again, part of the reason why this blog has gone unmaintained and gaining cobwebs is because I either forgot the steps to create/update things, or didn’t feel like going through and rereading my previous notes. I intended the switch to Hexo to make blogging easier, not harder.
A single “pet” VPS
On top of all of this, I’d inadvertantly shoehorned myself into placing an enormous amount of importance onto a single virtual server running from a single VPS provider. This is where I really made problems for myself, because it meant even though the build artifacts from Hexo were being stored in a Git repo it meant all of the actual source Markdown files (and any drafts, etc) would be lost if this Snowflake Server were to suffer an untimely demise.
“Pfft, that’ll never happen to me!” I foolishly said. “I won’t need to migrate off of this VPS!”
Then I had to migrate off of that VPS.
And I’m staring down the barrel of needing to migrate again - because I’m still running on the CentOS 7 host referenced in that post, even now that CentOS 8 is EoL. I could migrate to Rocky Linux 8, or back to some .deb-flavored distro, but these migrations would merely be a bandaid. It would just be melting one snowflake and freezing another into place.
Infrastructure should be cattle, not pets. I should be able to deploy this site pretty much anywhere without needing to worry about what’s running underneath it, and if there’s a problem with the underlying infrastructure I should be able to quickly deploy somewhere else with minimal hassle.
The vision - where we want to go
Enter containerization, and specifically Docker.
For those of you unfamiliar with the concept of container-based deployment, it’s a technology that provides so-called “OS-level virtualization”. Think of it kind of like a virtual machine, but lighter - instead of virtualizing a set of hardware and running an entire operating system on top of that emulated hardware, a container will share the kernel with the host OS and will only virtualize resources above the OS level that it needs - specific binaries, libraries, etc. It’s like a chroot on steroids.
There’s a bunch of containerization options available today - some are even built right into the Linux kernel. That said, the standard for a long time for containerization of specific applications has been Docker. Docker has been around for many years, and has become so popular and widely-used that entire ecosystems are being built around making these containers highly available and managing the entire container lifecycle (so-called ‘Container Orchestration’) - you may have heard of technologies like Kubernetes and Openshift being used for this.
One important aspect of containers that I think is often overlooked these days is that they’re supposed to be stateless - that is, they shouldn’t care about the underlying OS or filesystem they’re running on, and they should be able to be destroyed and recreated without worrying about affecting the underlying data inside. Lots of Docker apps will require you to mount filesystem resources from the host for configuration - I strongly disagree with this tactic unless it’s a matter of security (eg SSL certs, SSH keys, and the like shouldn’t be in containers). The less reliance on the host OS you have, the more bulletproof your container will be.
Back to my specific use-case. At the end of the day, when all of the Hexo deployment mumbo-jumbo is finished, this site is a flat set of files being served by nginx. Thusly, I reasoned to myself, why can’t I just throw all of these statically generated files into a Docker image and deploy that image?
So that’s what we’re going to do.
The implementation
Docker containers are deployed based on images. There are ready-made images available for pretty much every software you can think of, and in a lot of cases you can simply bind-mount a configuration directory from the host into the container and off you go. However, like I mentioned above, I very much want to have as many files baked-into the container as I can. This means we’re going to have to build our own container image! It sounds scary, but it’s actually pretty easy.
I’ve copied the source files from my VPS to my local machine to facilitate local development/implementation, and here’s what my file layout looks like. For those of you familiar with Hexo, this should look very familiar.
master@prometheus ~/hexo_build> ls
hexo
master@prometheus ~/hexo_build> ls hexo
_config.yml  db.json  node_modules  package.json  package-lock.json  public  scaffolds  source  themes
Iteration 1 - Node parent image
Docker images are based on layers. Every modification you do to a container image adds an additional layer to the image, containing all changes made up to that point. If you want, you can create an entirely new base image completely from scratch! However, like libraries and modules in programming/scripting, it doesn’t always make sense to reinvent the wheel and we can leverage the hard work of other users by using a parent image that makes the most sense for the app you want to deploy.
In our case, Hexo is based on Node, so it makes sense to use a parent image with Node baked into it. Luckily, Node provides just such an image for us to use. Perfect.
The first step in building a Docker image (after making sure the Docker Engine is installed and running) is to create a Dockerfile. This is like a ‘recipe’ that Docker uses to build your image. Here’s what the initial version of the Dockerfile I used looks like:
1 | FROM node:18.10.0-alpine3.15 |
Let’s dig into what’s going on here.
FROM instructs Docker to pull the image (and tag) specified and use it as the parent image. In our case, we want to use a recent version of the Alpine flavor of the node image from Dockerhub (the default Docker registry used unless otherwise specified) and apply all changes on top of this parent image.
WORKDIR is like the Docker equivalent of mkdir -p + cd - it will specify the working directory within the container/image used for future commands, and will create the directory if it doesn’t exist.
COPY does what it says on the tin - it copies files/folders into the image from the local filesystem. In this case, because we specified /hexo as the working directory within the container, this command will copy the contents of the hexo directory from the local filesystem into the /hexo directory inside the image.
RUN is also self-explanatory - it will run the specified commands inside the container as a part of the build process. The first RUN command installs the necessary Node modules into the container (and makes sure they’re up to date). The second command actually runs Hexo and generates the static content, dumping it into the folder specified in the Hexo config (in my case it dumps it into the public folder in the working directory).
CMD and EXPOSE instruct Docker of the command to run when the container is started, and any ports the container should expose. Here we’re setting the command to run as npx hexo server -s, which runs a local Hexo server and exposes the content over port 4000, and we’re also telling Docker to open port 4000 for external connections.
We can then build this image using the docker build command. Here’s a snippet of what that looks like:
master@prometheus ~/hexo_build> ls
Dockerfile hexo
master@prometheus ~/hexo_build> docker build -t website-iteration-1 .
Sending build context to Docker daemon  59.51MB
Step 1/7 : FROM node:18.10.0-alpine3.15
18.10.0-alpine3.15: Pulling from library/node
---snip snip snip---
Successfully tagged website-iteration-1:latest
And just like that, our shiny new Docker image has been built! The -t website-iteration-1 section specifies what to call the image, and the period at the end of the command is super important as it tells Docker to look in the current directory for a file called Dockerfile to use to build the image.
If we take a look at what images are available on our system now, we can see both the Node parent image as well as our generated image:
master@prometheus ~/hexo_build> docker image ls
REPOSITORY            TAG                  IMAGE ID       CREATED              SIZE
website-iteration-1   latest               ac2937c27bbb   About a minute ago   223MB
node                  18.10.0-alpine3.15   a9d1426fcd0a   7 days ago           167MB
We can now run this image locally to take a look at what everything looks like:
master@prometheus ~/hexo_build> docker run --rm -p 4000:4000 website-iteration-1
INFO  Validating config
WARN  Deprecated config detected: "external_link" with a Boolean value is deprecated. See https://hexo.io/docs/configuration for more details.
INFO  Start processing
INFO  Hexo is running at http://localhost:4000/. Press Ctrl+C to stop.
And if we open up a web browser and point it at localhost:4000, sure enough we can see a copy of this blog as it exists at this point!

If we wanted to, we could stop right here, export this image to a registry of our choosing, and spin it up on any server/VPS/whatever running Docker. We could put something like Traefik in front of it for SSL termination and use docker compose to orchestrate both containers, and all would be well.
However, this isn’t good enough for me.
- Take a look at the size of the generated
website-iteration-1container. 223MB? for a simple web server serving flat files? That’s entirely too large. Just 4 versions of the image could potentially take up almost a gigabyte of space! Most of these files are things that we don’t actually need to serve static content - node build artifacts, etc. And remember, more stuff in the container means more complexity and more potential vulnerabities. - Also, we can inspect the contents of the files inside of the container by running it interactively with
shas the command/endpoint:master@prometheus ~/hexo_build> docker run --rm -it website-initial /bin/sh /hexo # ls _config.yml db.json node_modules package-lock.json package.json public scaffolds source themes
You can see all of our source files, drafts, and other non-public items inside of the conatiner image. If we happen to push this image to a public registry like Dockerhub it would mean that anyone who pulls this image has access to potentially work-in-progress items! This is definitely not best practice.
We can do better.
Iteration 2 - multi-stage builds and nginx
Previously I was using nginx to host the statically generated files, so I figured ‘why not use nginx as our base image?’ And this makes sense in theory, but we still have to use Node to actually generate the files. Can we do both?
It turns out, yes we can!
The Docker build process has support for multi-stage builds, similar to a CI/CD pipeline. We can use Node as the parent image for the first stage of the build, have it generate the static files we need, and then invoke a second stage of the build using an nginx parent image and simply copy over the build artifacts that we want to serve. This nginx image is what will become the final image of the build process - all contents of the intermediate Node image are discarded (well, kind of - the actual intermediate image does still exist locally, but it can easily be removed using docker prune).
Let’s modify our Dockerfile to utilize multi-stage builds!
Here’s what it will look like:
1 | FROM node:18.10.0-alpine3.15 AS base |
You’ll quickly notice the use of the AS directive. This allows us to generate intermediate images (in this case called base and final) and use them in later stages of the build. This build is broken into 3 stages:
- Use the Node image as our parent image called
base, copy our source files into it, and install the Hexo-related bits into it. - Take the
baseimage and generate the static files to be served by nginx (again dumping the static files into thepublicdirectory of the working directory). - Use the
stable-alpinetaggednginximage from Dockerhub, and copy the static files generated in step 2 into the directory where the nginx container expects to see them. I also copy in my nginx configuration file, as it’s extremely basic and there’s no real sensitive information to be gleaned from there.
Here’s what that full build now looks like, slightly edited for length:
master@prometheus ~/hexo_build> docker build -t website-final .
Sending build context to Docker daemon  59.52MB
Step 1/9 : FROM node:18.10.0-alpine3.15 AS base
 ---> a9d1426fcd0a
Step 2/9 : WORKDIR /hexo
 ---> Using cache
 ---> 1174c1615baf
Step 3/9 : COPY hexo .
 ---> a85229c4c6b3
Step 4/9 : RUN npm install hexo && npm audit fix --force
 ---> Running in 454ff453da13
---snip snip snip---
found 0 vulnerabilities
Removing intermediate container 454ff453da13
 ---> 8e2b107f26c1
Step 5/9 : FROM base AS final
 ---> 8e2b107f26c1
Step 6/9 : RUN npx hexo clean && npx hexo generate
 ---> Running in 2ffcbe1130da
---snip snip snip---
Removing intermediate container 2ffcbe1130da
 ---> 98cc3e75f1b9
Step 7/9 : FROM nginx:stable-alpine
stable-alpine: Pulling from library/nginx
213ec9aee27d: Already exists
1bfd2b69cf63: Already exists
a19f4cc2e029: Already exists
4ae981811a6d: Already exists
7a662f439736: Already exists
a317c3c2c906: Already exists
Digest: sha256:addd3bf05ec3c69ef3e8f0021ce1ca98e0eb21117b97ab8b64127e3ff6e444ec
Status: Downloaded newer image for nginx:stable-alpine
 ---> 5685937b6bc1
Step 8/9 : COPY --from=final /hexo/public /usr/share/nginx/html
 ---> 6968a731b0a3
Step 9/9 : COPY sites.conf /etc/nginx/conf.d/
 ---> 001ac14f2e8a
Successfully built 001ac14f2e8a
Successfully tagged website-final:latest
Here’s what the list of images looks like now:
master@prometheus ~/hexo_build> docker image ls
REPOSITORY            TAG                  IMAGE ID       CREATED          SIZE
website-final         latest               001ac14f2e8a   7 minutes ago    25.2MB
none                  none                 98cc3e75f1b9   7 minutes ago    223MB
website-iteration-1   latest               ac2937c27bbb   38 minutes ago   223MB
node                  18.10.0-alpine3.15   a9d1426fcd0a   7 days ago       167MB
nginx                 stable-alpine        5685937b6bc1   7 days ago       23.5MB
You can see that the resultant image is much smaller than in the first iteration - only about 25MB in size! That’s more than acceptable for me.
I have the SSL certs handy for this domain, and as I mentioned SSL certs are one example of items you don’t want to keep inside of a container image, so I’ll mount those where my nginx config expects to see them. If I modify my hostfile to point this domain to localhost and run the container, this is what I wind up with:
master@prometheus ~/hexo_build> grep andrew /etc/hosts
127.0.0.1 andrewsiemen.com www.andrewsiemen.com
master@prometheus ~/hexo_build> ls
Dockerfile  fullchain.pem  hexo  privkey.pem  sites.conf
master@prometheus ~/hexo_build> docker run --rm \\
                -v /home/master/hexo_build/fullchain.pem:/ssl/fullchain.pem \\
                -v /home/master/hexo_build/privkey.pem:/ssl/privkey.pem \\
                -p 443:443 website-final
/docker-entrypoint.sh: /docker-entrypoint.d/ is not empty, will attempt to perform configuration
/docker-entrypoint.sh: Looking for shell scripts in /docker-entrypoint.d/
/docker-entrypoint.sh: Launching /docker-entrypoint.d/10-listen-on-ipv6-by-default.sh
10-listen-on-ipv6-by-default.sh: info: Getting the checksum of /etc/nginx/conf.d/default.conf
10-listen-on-ipv6-by-default.sh: info: Enabled listen on IPv6 in /etc/nginx/conf.d/default.conf
/docker-entrypoint.sh: Launching /docker-entrypoint.d/20-envsubst-on-templates.sh
/docker-entrypoint.sh: Launching /docker-entrypoint.d/30-tune-worker-processes.sh
/docker-entrypoint.sh: Configuration complete; ready for start up
2022/10/14 16:48:26 [warn] 1#1: the "ssl" directive is deprecated, use the "listen ... ssl" directive instead in /etc/nginx/conf.d/sites.conf:11
nginx: [warn] the "ssl" directive is deprecated, use the "listen ... ssl" directive instead in /etc/nginx/conf.d/sites.conf:11
2022/10/14 16:48:26 [notice] 1#1: using the "epoll" event method
2022/10/14 16:48:26 [notice] 1#1: nginx/1.22.0
2022/10/14 16:48:26 [notice] 1#1: built by gcc 11.2.1 20220219 (Alpine 11.2.1_git20220219)
---snip snip snip---
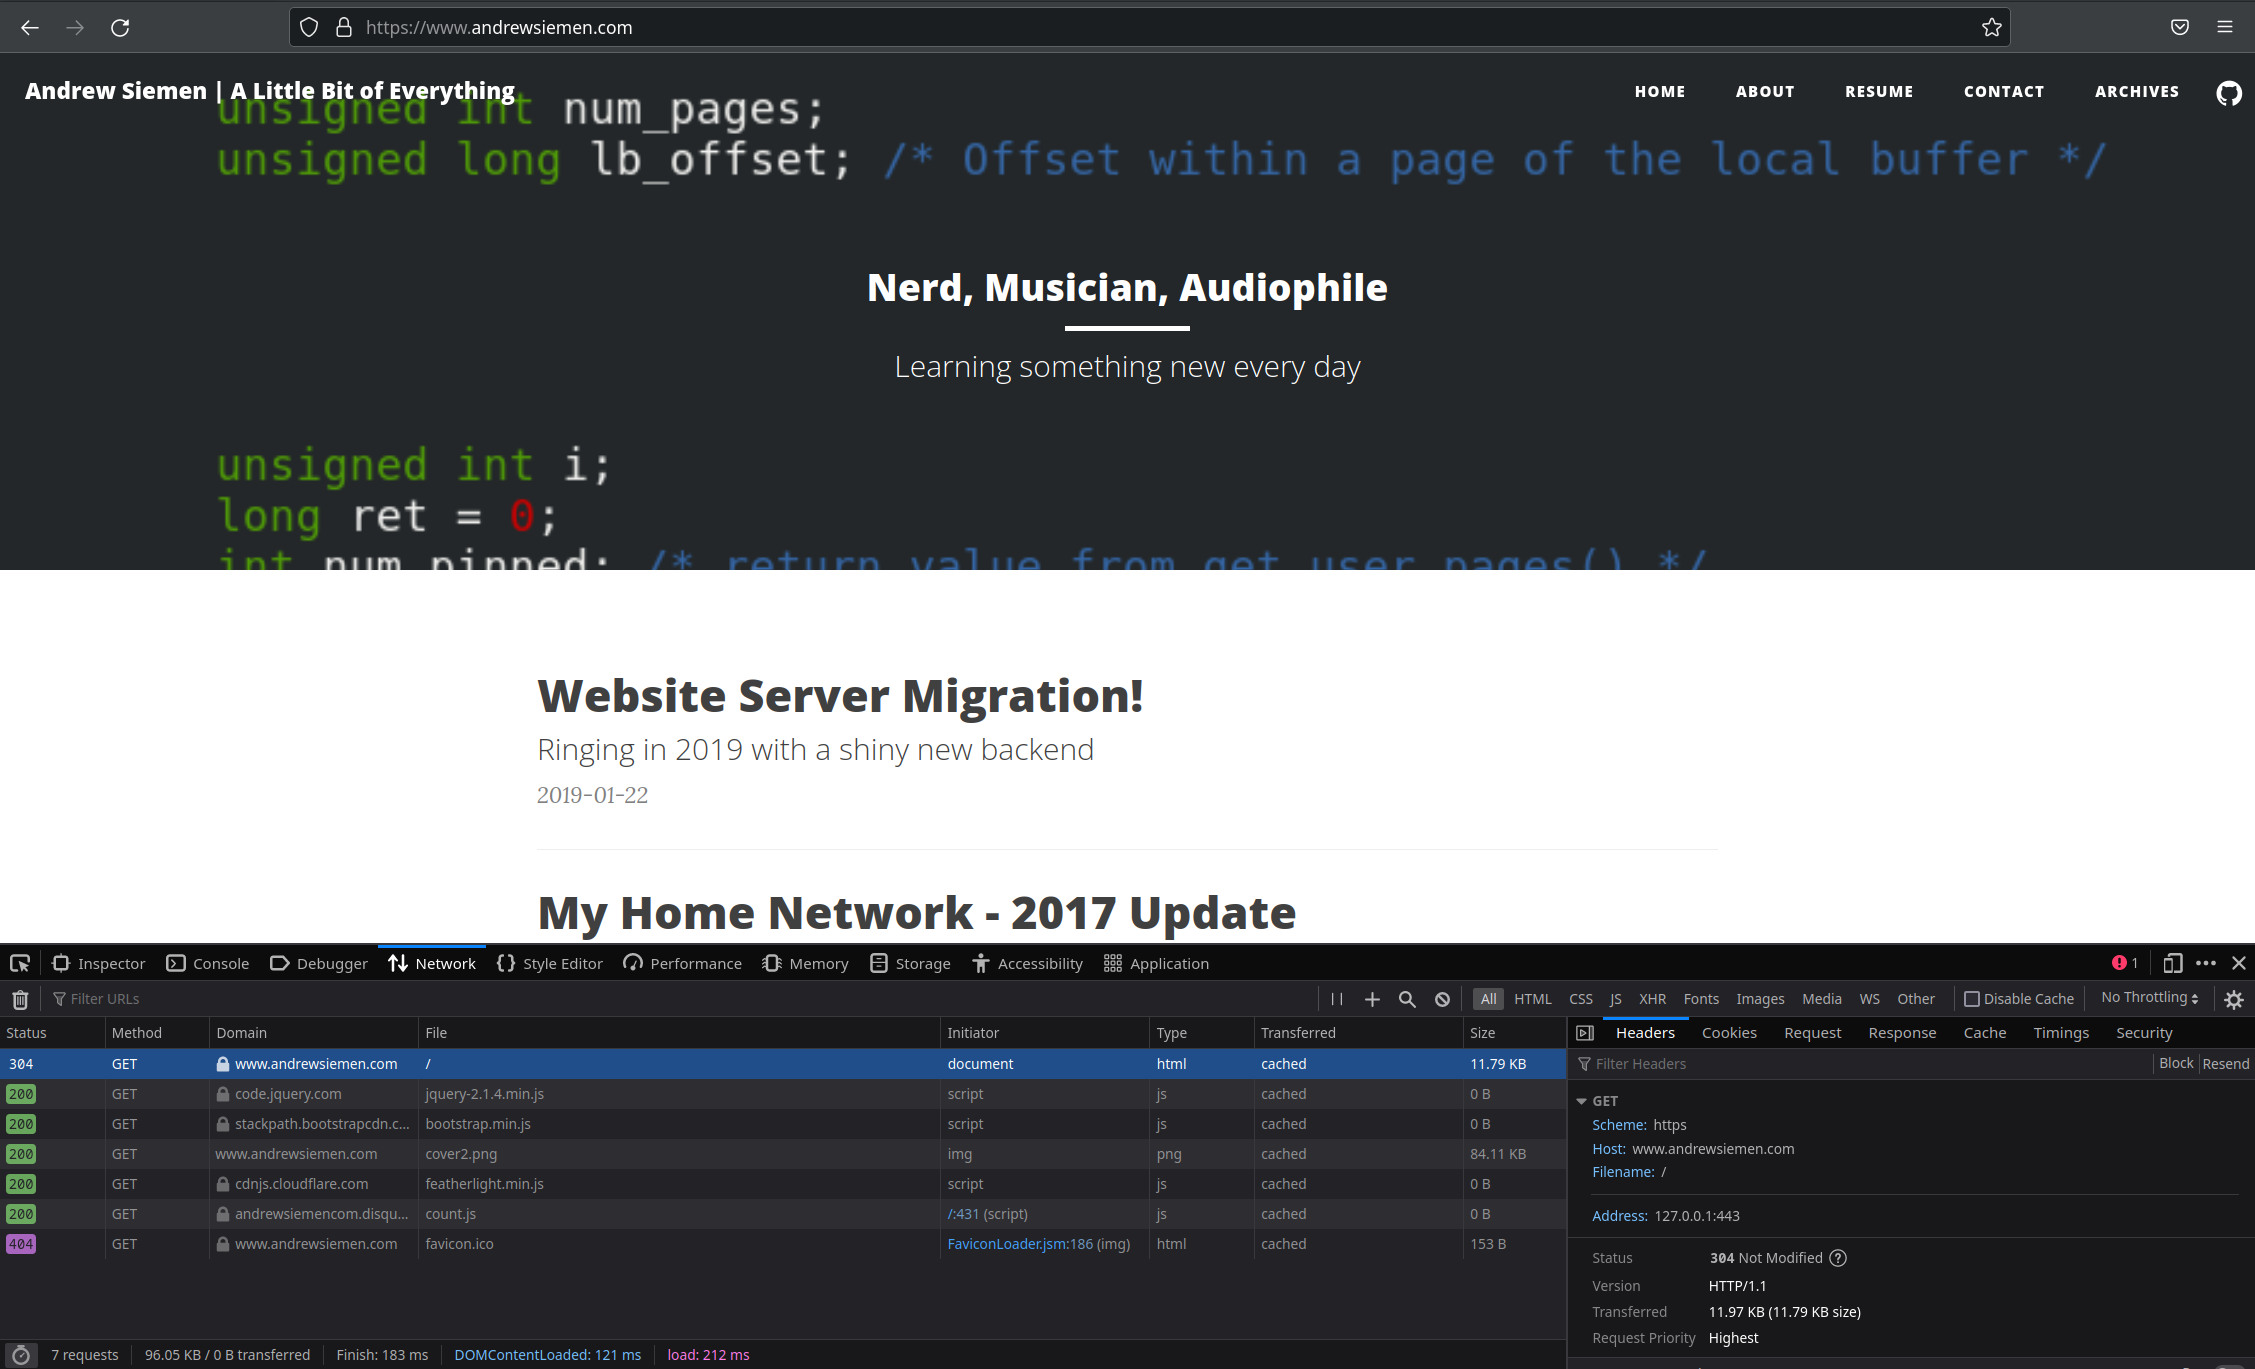
Looking closely at the screenshot, you can see the address of the request is 127.0.0.1, which means we are in fact loading this site from the locally running Docker container, with all files necessary for operation contained completely within this container.
Conclusion
And that’s all there is to it! This image can now be used anywhere a ‘standard’ Docker image can be used. I could even use this image as the basis of a Kubernetes deployment and have this image running on a K8s cluster if I wanted to. The exact commands used in this blog post were used to generate the Docker image which is now powering this website!
I’m super familiar with the use of Docker and use it all the time in both my professional life and also my homelab, but this is actually the first time I’ve built a Docker image from the ground-up instead of simply bind-mounting files into the container. The next logical step is to take this Dockerfile and use it as the basis for a Jenkins build pipeline, such that Jenkins will automatically build an updated image for me any time I commit code to the (private) repo which houses my source files!
That’ll have to wait for a future blog post, though ;)
Questions? Comments? Did I do something glaringly stupid or miss something completely obvious? Let me know in the comments!
The header image for this blog post is a lightly edited version of an image taken from this site and was not initially created by me - all credit goes towards the original artist.